

A sublime kitchen design with soft whites and wood, flat-paneled doors.
If you’re starting your first IKEA kitchen and feel overwhelmed, you’re not alone. First-time IKEA customers often do initially. Between navigating the IKEA Home Planner; researching kitchen design and kitchen cabinet options that suit your vision (and budget!) and — if you’re DIYers — understanding how to properly install your IKEA cabinets, there’s plenty of IKEA idiosyncrasies to learn. This is especially true if your kitchen needs a lot of customization. Fortunately, if you collaborate with design professionals, chances are you’ll feel like an expert when your kitchen project is complete.
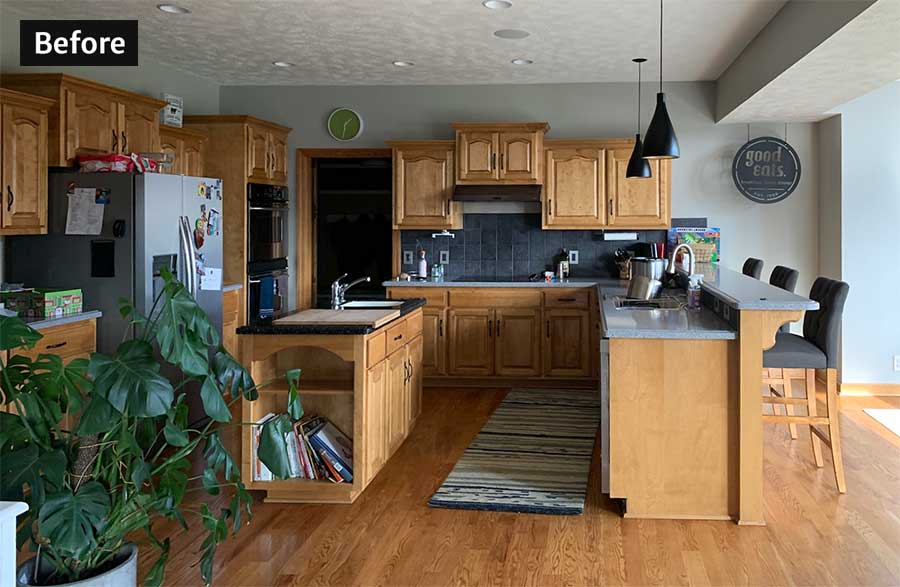
This was what happened for IKD customer Adam from Omaha, NE, who — along with his wife — renovated their previously outdated and inefficient kitchen layout into a European-style IKEA kitchen with many custom storage options (including several of IKD’s signature kitchen cabinet “hacks”) and a striking center island ideal for family meals.
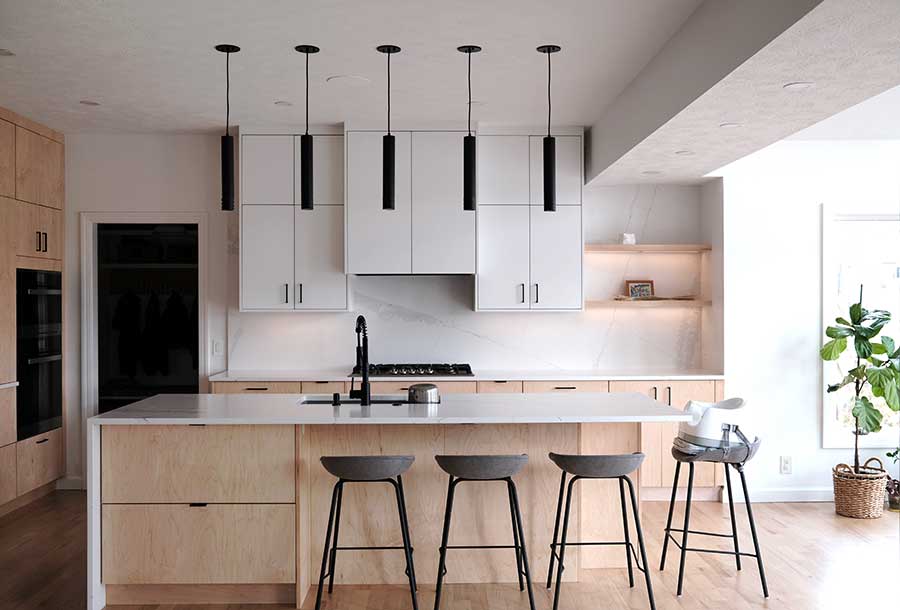
“I knew from my online research that I preferred an eating area at the island and seating on two sides of the island. We also fell in love with the minimalist style. That’s how we decided we wanted a streamlined, built-in look with the Miele oven and microwave combo and the tall cabinets and the pullout spice cabinets for plenty of storage options,” Adam says.
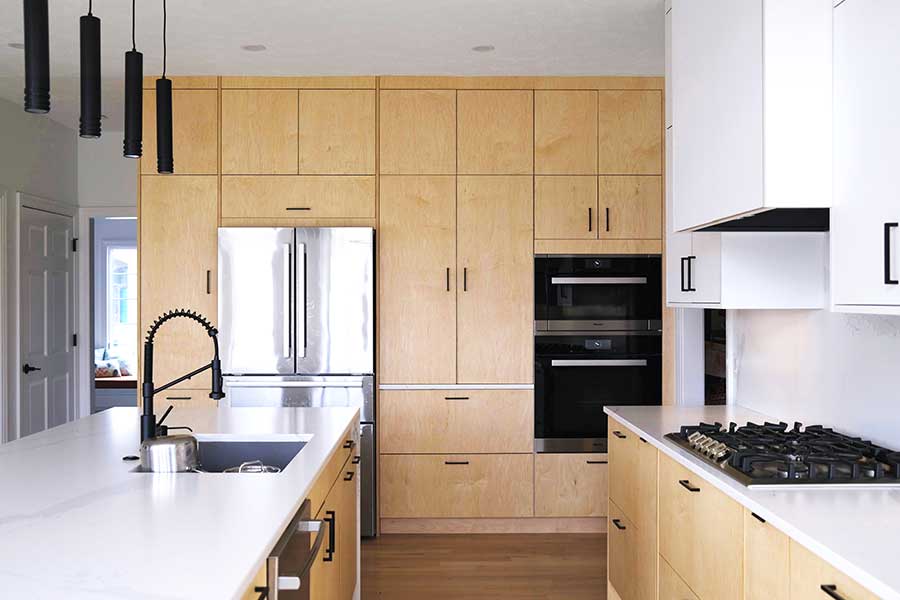
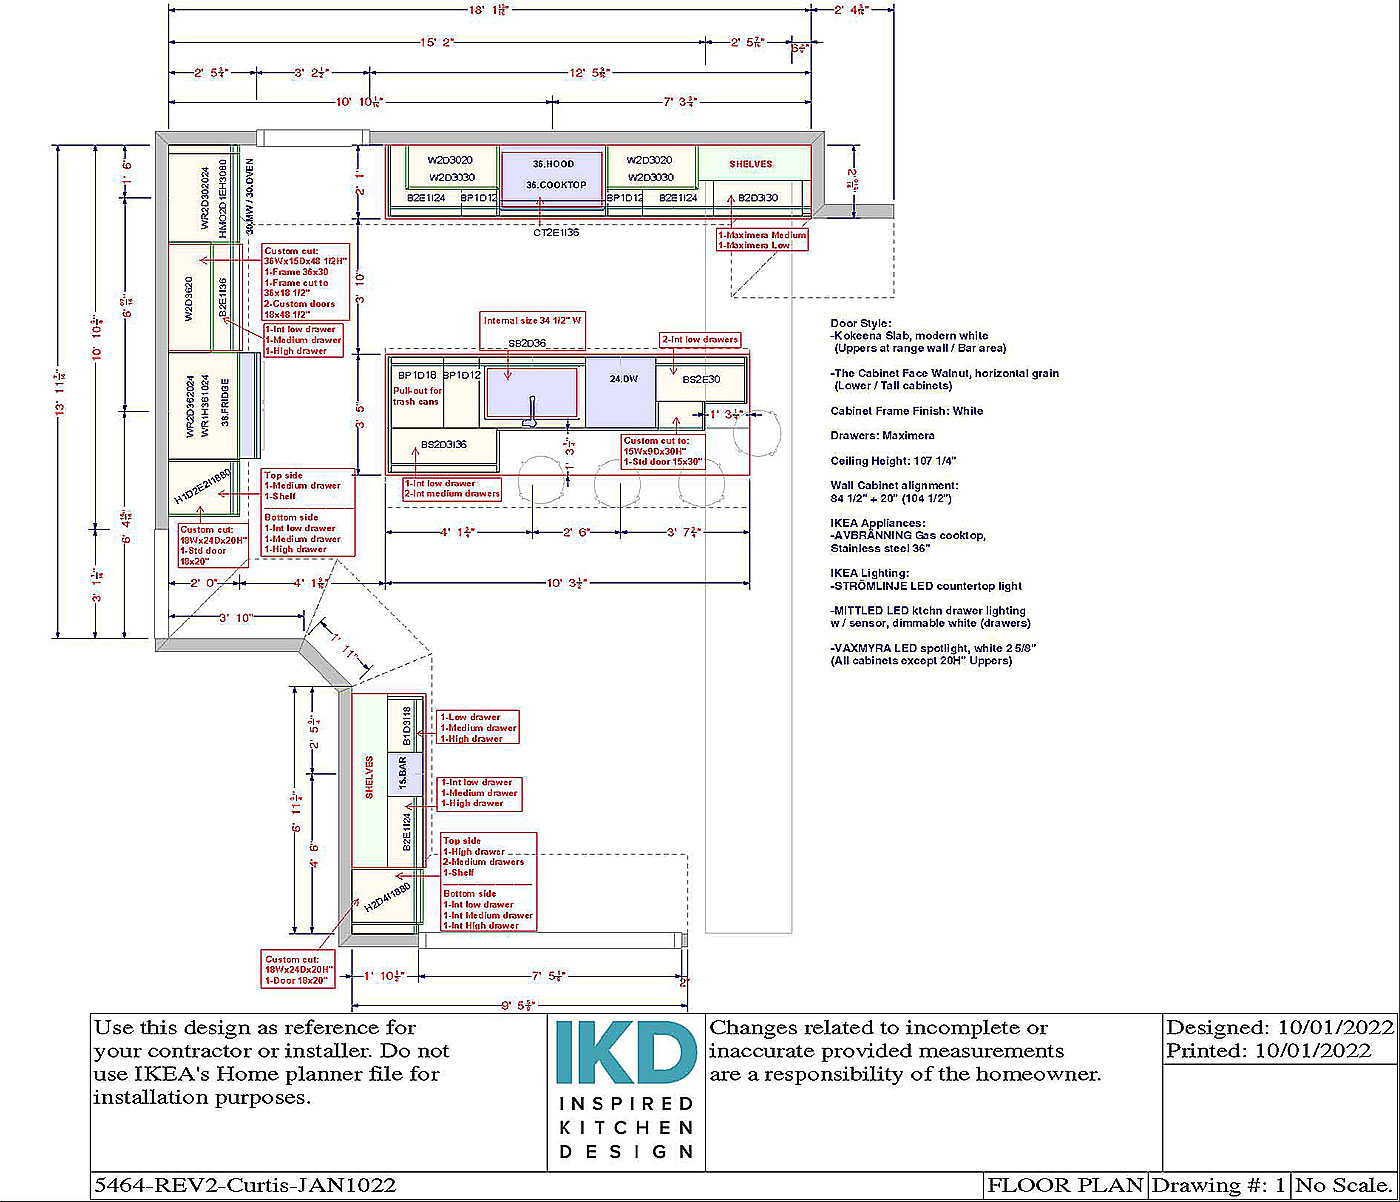
He adds that he selected IKEA cabinets because he liked the quality of IKEA’s BLUM hardware and the versatility the SEKTION system provides in terms of customization and organization as well as available third-party custom door front options. After finding IKD online and with a budget of $50,000 (including $10,000 set aside for new appliances), Adam worked with IKD designer Daniel to renovate the family’s very outdated kitchen (think lots of wasted wall space and inefficient storage and workflow). The team combined IKEA’s SEKTION kitchen system with custom solid slab Maple door fronts from Plykea for the base and tall cabinets and solid slab Plykea Fenix door fronts in the Bianco Kos color, seen on the upper cabinets to house and conceal the Kobe Range Hood above the 36″ stainless steel IKEA AVBRANNING gas cooktop ($849).
To complement the design theme, which Adam describes as “a very lightweight Scandinavian look with raw wood and white cabinets,” he selected IKEA MAXIMERA drawers; a Thor kitchen wine cooler; IKEA STROMINJE LED countertop lights; an IKEA MITTLED LED kitchen drawer lighting with dimmable sensor; a 32″ (w) x 19″ (d) x 10″ (h) undermount sink from Kraus; a 36″ Bosch stainless steel refrigerator; a Bosch dishwasher; Silestone Ethereal Dusk countertops in a suede finish and an IKEA VAXMYRA LED spotlight for all cabinets (except the 20″ (h) upper cabinets), among others. The design also features several custom cabinet options, including an IKEA SEKTION base cabinet spice pullout for extra storage, and an IKEA SEKTION base cabinet trash pullout featuring IKEA MAXIMERA low and medium drawers. This incredible transformation (including the IKEA total cabinet price ($6,329) and all extra items ($751.49) price) only costed Adam $7,080.49.
Let’s see how Adam’s kitchen came together!
We provide clarity for your IKEA Kitchen design journey
GET STARTEDTrusting the Process
Adam and his wife were complete novices when they began their kitchen.
“We started with the IKEA planner software and had a decent mockup but there was always a nagging feeling that we didn’t really know what we were doing or that we were missing something. We’d never done any kind of home renovation project so the entire process was a step-by-step learning adventure, which was very intimidating,” he explains.
Adam adds that Daniel designing the kitchen meant that the layout was not missing any necessary elements, so he and his wife gained confidence that the foundation and kitchen design were solid.
Overcoming Obstacles
The family had very specific needs for their kitchen renovation.
“We insisted on a large island with enough space for cooking and a seating nook. Daniel maximized the size of the island based on what our space would allow and gave us a base cabinet layout that provided seating for four people. Our family eats breakfast on the island every morning,” he says.
With so much wasted wall space in their original kitchen, the IKEA cabinets also needed to provide ample storage. The cabinet wall upper alignment is 84.5″ plus 20″ with stacked cabinets for a total cabinet height of 104-1/2″. Between the top of the cabinet and the ceiling there is also a trim that is 2-3/4″ to fill out the space. Now it’s effectively a wall of storage for small appliances and pantry items — perfect for preparing family meals together! To do this Daniel changed the direction of the original small island and eliminated the existing peninsula which opened up more space for the countertops and the IKEA SEKTION base cabinets with the Plykea maple door fronts. The different IKEA cabinet sizes allowed the design to extend the tall cabinets above the Bosch refrigerator to the top of the 107-1/4″ high ceilings. [Designer note: Adam opted for the Bosch refrigerator rather than a complete built-in look based on his budget.]
The slab maple door fronts do create a minimalist effect that complements the solid slab Plykea Fenix door fronts in Bianco Kos seen above the cooktop and smartly conceal the Kobe hood with false fronts. Plykea was also able to use a CNC router to provide hidden channels for the lights on the bottom of the upper cabinets. The same was done with the solid maple open shelving.
“The wall with our refrigerator/oven is basically a solid wall of cabinets other than the appliances. It’s one of my favorite things and it plays well off of the otherwise simple island and cooktop wall in the design. Plus we have tons of storage!” he says.
Other products featured include: White IKEA FORBATTRA toe kicks; an IKEA UTRUSTA hinge with built-in damper for kitchen; IKEA countertop support fixtures, galvanized; and (18) extra IKEA SEKTION legs.
Island Style
Upgrading the center island was key to this layout. The original island featured two 18” (w) cabinets and a 12” (w) cabinet — not nearly enough space for proper storage or family meals.
To add extra storage and the seating suitable for family meals in the new island, different base cabinet sizes were used. To the left of the sink, there is the 12″ (w) x 24” (d) spice rack and an 18″ (w) x 24” (w) trash can. Meanwhile the sink base cabinet is 36″ (w). On the right side of the sink, there is the Bosch dishwasher and a 30″ (w) x 15″ (d) base cabinet. On the short L-shaped side of the island is another seat, and to the left side of the other seats (on the long L-side) is a 36″(w) x 15″ (d) x 30″ (h) base cabinet that faces the bar area.
A Dry, Home Bar (no sink)
Another request was a separate dry bar with a beverage fridge and open shelves, tiles and art on the top.
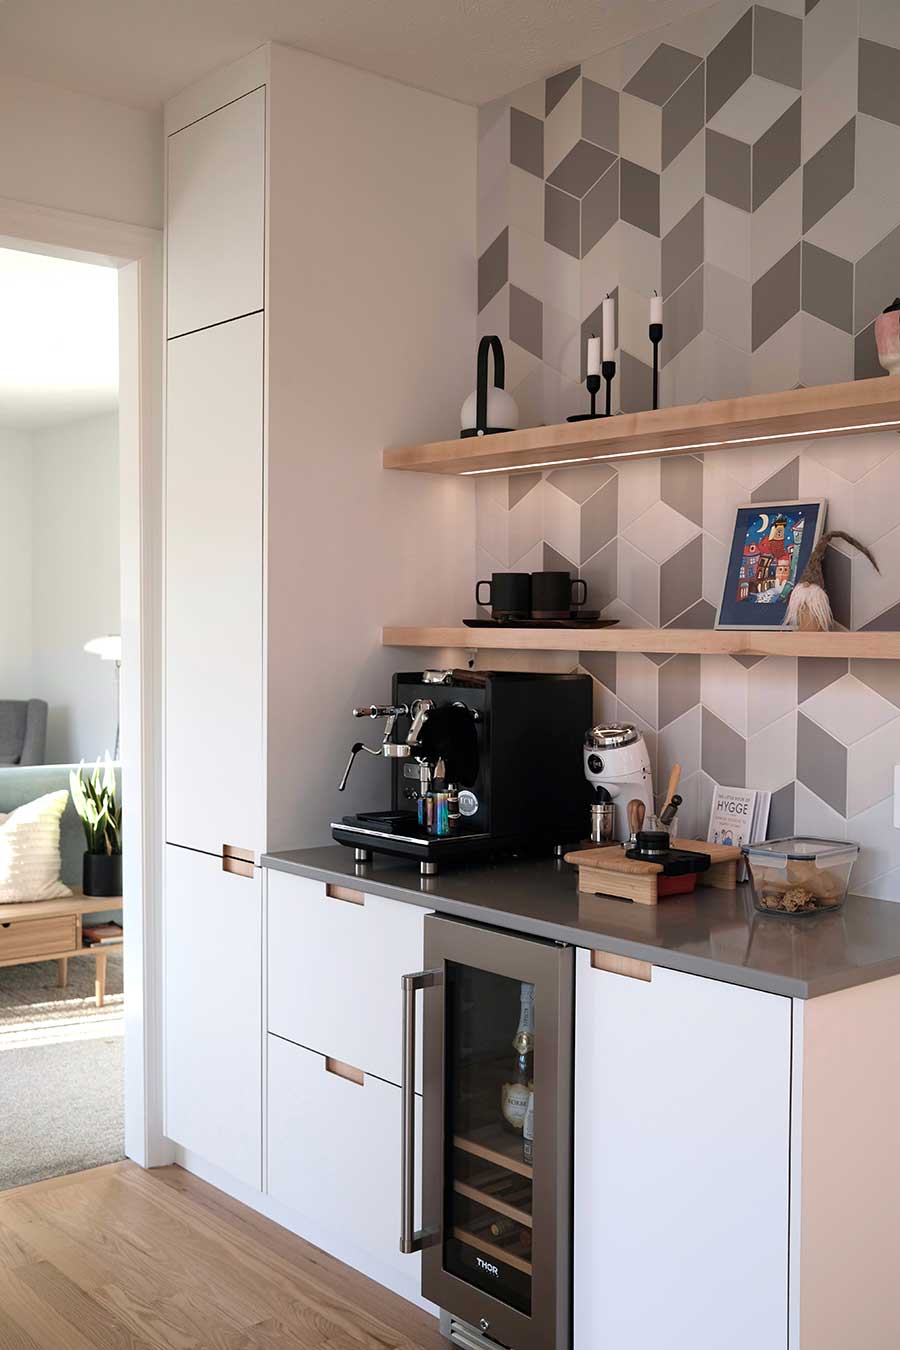
Daniel designed a dry bar that complemented the rest of the kitchen including an espresso machine and the 24″ Thor wine cooler. True to Adam’s wishlist, the bar area has photos and artwork displayed on open wood shelving and additional storage options from the solid slab Plykea Fenix door fronts in Bianco Kos featured on the base and tall cabinets. This area features one of the kitchen cabinet modifications, or “hacks,” devised by Daniel to create customization options. Specifically, the 18” (w) x 24” (d) x 30” (d) SEKTION wall cabinet frames were custom cut to 18” (w) x 20” (h) x 24” (d) in order to create a streamlined look. [Pro tip: Adam was able to splurge on the wine cooler because the couple sold their old cabinets and countertops for $3,000!]
Custom IKEA Cabinet Designs
Customization was a big part of this minimalist kitchen.
Cabinet modifications are featured on the wall of storage, as the IKEA cabinet frame cut to 18″ (w) x 24″ (d) x 20″ (h) was used to achieve cabinets that extended to the ceiling height, such as at the top of the bar area as well as to the left above the refrigerator. Meanwhile the cabinet frame used as pantry storage was custom cut from 36″ (w) x 15″ (d) x 20″ (h) to 36” (w) x 15” (d) x 18.5 (h). The last “hack” is featured on the center island. Here, the team took the original size of the IKEA SEKTION base cabinet frame ($46) on the island and modified the depth from 15″ (w) x 15″ (d) x 30″ (h) to 15″ (w) x 9″ (d) x 30″ (h). This creates an efficient workflow and extra storage options after meals so cleanup will be easy and stress free!
DIY Advice
Adam has some expert-level advice for other new IKEA remodelers.
“Don’t skimp on the design process. In my opinion, $500 is more than worth the price of admission to ensure that you aren’t making any devastating mistakes. There are so many potential pitfalls you can’t possibly be aware of until you’ve built one (or a hundred) of these kitchens,” Adam says.
Other tips he shared include:
- He drilled his own holes in the rail when necessary if the pre-installed holes didn’t line up well with the studs in a given area.
- Double check to make sure that every IKEA cabinet is square after you build it and before you nail in the backing.
- To make sure you don’t hit electrical or plumbing in the wall, you can drill out test holes in each stud cavity and use a USB endoscope hooked up to a phone (available at Amazon) to look inside to find out where any pipes or electrical wires might be.
- Use masking tape when cutting cover panels on the table/miter saw to prevent tear out.
- A tool he used for installing cover panels was a precut piece of wood that was exactly the thickness of the cabinet door material. This ensured that the cover panels lined up flush with the cabinet doors after they are installed and gave him a consistent measurement for knowing how far the cover panels should stick out before clamping them in and screwing them down.
“It feels so good to have made this project happen from start to finish — with a little help from our friends at IKD — and now we have this finished product that still takes my breath away to look at and use. It truly changed how our family uses the house in so many positive ways. And with all of the knowledge and skills we’ve gained in the process of making this project happen we feel like we can turn any given room in this house into anything we can dream up,” he says.
As you can tell, Adam really learned a lot during his IKEA kitchen remodel. If you’re ready to start renovating your IKEA kitchen, our team is here to help you get started — and get similar results
Get a Professional IKEA Kitchen Design – All Online
Work with our certified kitchen designers to get a personalized kitchen designed around your needs and vision. If you’re interested in learning more about our service, make sure to check out our IKEA Kitchen Design Services.